Tuesday, 1 April 2014

Marquee Development (P4,P5)


Marquee Development Log

This is a development log for the marquee that was made to go on the arcade cabinet, it is used to attract people to play my game Hunter
This is the original version of my marquee:
 
I shared this version of my marquee with my peers using social networking site. I received some extremely useful feedback that influenced my next version.


Using the feedback I had previously received a I changed the background of my marquee to make it stand out more.

When I then resubmitted my marquee to get more peer reviews on my new version, I then used the constructive feedback received to create a new and improved version.
 
I used the feedback from my peers to create my final marquee. It was suggested that I try to make the helmet look as if it is embedded it the marquee. It was also suggested that I add out glows to my text and logo to make the marquee stand out more.
 

Poster Development (P4,P5)


Hunter Poster Development Log:

This was the first version of my poster that I created.

 
Once I had finished my poster shared it with my peers over social media sites asking for feedback, the feedback received was very constructive and the overall message I received from it was that I need to include the title of my game.


I then resubmitted my poster for my peers to review again. The second set of feedback I received told me to change the font to a darker red and add some effects.
After reading the feedback I made appropriate changes and this was my final image

File Formats (P2)


File management

Naming files:
It is important to keep the name of files short, this makes it quick and easy to search and find images. When naming an image file you should pick a meaningful name to do with the image for example an image of a red door could be called “red_door” or “door_red”. This method makes it easy for anyone to know what the file will contain. Another good way to name image file is to stick to naming conventions such as using a _ instead of a space in the file name.
Using naming conversions and meaningful names improves the organisation of files and make it considerably easier to find image files.

Folder structures:
Folder structures are an important part of maintaining organisations with files. Most operating systems allow multiple folders to be created and then subfolder within that folder, this allows for a complex but organised file layout. This method of origination allows you to place image files into groups based on what the images have in common. An example of this would be placing all the pictures of laptops in one folder and in another folder all the pictures of Xbox 360.

Moving files:
Moving files can be risky if certain precautions are not taken to ensure that multiple copies of files are made, if these precautions are not taken you run the risk of losing a file permanently.
Creating copies of an image file and moving to storage device such as a USB stick is a good idea due to how easy it is to copy and move files on the latest operating systems. One of the easiest and most common ways of moving and copying files at the same time is to copy and paste the file into the desired location.

Deleting files:
Deleting files is an easy and basic operation on most operating systems, but care should be taken when deleting files as hard drives do have a data recovery system allowing files to be restored.

Vector and Raster Graphics:

Raster (bitmap):
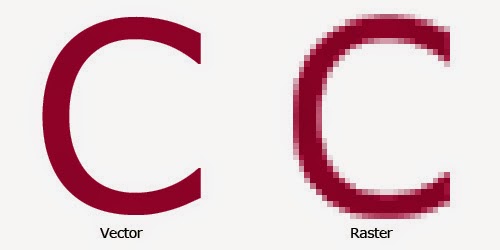
Raster images are made of pixels of a set colour and shades that create the image. Each raster image pixels represents a different colour rather than an instruction, this is one of the main reasons raster images are used in high detailed images or photographs. This file type does not scale very well; this is because you are spreading the same image data over a larger area. The image on the right is an example of how a raster reacts to being scaled in comparison to a vector image.

GIF:
Graphics interchange format is a form of raster graphic. This file format supports animation and transparency making it very popular on the internet; this is also due to its quick loading times. GIF files support images up to 256 colours; this limitation causes GIF’s to have a poorer a quality in comparison to other file formats.

 
Vector:
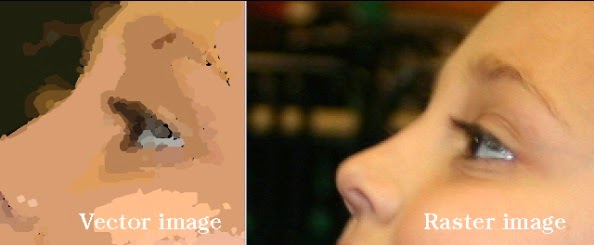
Vector images use a set of instruction to create an image. This allows vector images to be scaled up and down without the losing any of the image quality, this makes vector graphics the ideal file format for a logo because it may need to  be produced at multiple sizes. A major disadvantage of this file format is its inability to handle complex graphics such as a photo that could contain a large amount of different instructions. The image on the right is an example of how a vector image cannot give the same graphical quality of a photograph as a raster image.

SVG:
Sizable vector graphics is a vector file format. This file format is an all-purpose vector format. As with the majority of vector graphics it cannot display photorealistic images very well .This file format supports animation and transparency. It is commonly used on interactive web pages and is also supported by the majority of modern browsers.
 
Lossy and Lossless Compression:
It is possible to reduce the file size of an image using compression. The first method of compression is called lossy compression. Lossy compression works by putting the colour information into blocks and eliminating unnecessary bits of information, this in turn dramatically reduces the file size. Once an image has been compressed you cannot get the original uncompressed file back
The second method of file compression is lossless.  This method allows the image to keep all of its uncompressed data. It does this by using data algorithms; these algorithms break the image data down for compression but also allow all of the data to be fully restored.


Monday, 31 March 2014

Hardware and Software Required to Work with Graphic Images (P1)

PDFhttps://drive.google.com/file/d/0B7Go5XyQzJkuYlhPdWNGWEJiYjQ/edit?usp=sharing
 
 
Hardware and Software used in Digital Graphics 

Hardware:

Name:


Description:


Purpose:


Monitor


A form of output device, comes in a wide verity of forms such as: LCD, LED and CRT 


Displays images so the user can visually edit the image


Mouse


A form of input device, normally connected to a device via USB


Allows the user to edit an image using movement. Works in conjunction with the monitor to visually edit images


Keyboard


A form of input device

Normally connected  to a device via USB


Allows the user to use graphic editing software more efficiently by using shortcuts

It also allows the input of text


Graphics Card


A form of output device.

This device allows for powerful and efficient rendering


Specifically designed to render graphics, also allows for advanced effects and filters


Central processing unit


A form of output device

This device will render graphics if a Graphics card is not available


Similar to a graphics card although  not as efficient because it’s not specifically designed for this purpose


RAM


A form of volatile storage


Allows the user to access large amounts of image data quickly


USB


A form of non-volatile memory

Portable flash storage memory

Ranges from 128mb to 256gb


Allows the user to create backups and easily move files to different systems


Hard disk drive


 A form of non-volatile memory used for storing a large amount of files 


Allows the user to save finished work and work in progress, also allows them to store all the graphic editing software needed


Printer


A form of output device, normally connected via USB

A large amount of types available such as: Ink jet, laser and plotter


Allows the user to make digital images into physical images via the use of a material such as paper


Scanner


A form of input device

Normally connected via USB


Allows for the transformation of a physical image to a digital image that can then be digitally edited


Software: 
Software:


Description:


Purpose:


Operating systems


Allows a user to interact with a computer

Also manages the computers resources


The OS allows the user to run graphic editing software such as Photoshop


Graphical editing software


A piece of software specifically designed to edit images


Graphical editing software allows a user to edit and manipulate an image


Internet browser


Allows the user access to the world wide web


An internet browser can be used to find recourses such as royalty free images.

It can also be used to download new graphical editing software


Image viewer


A piece of software that allows the display of digital graphics in a verity of file types


This software allows a user to view different images, although the editing that can be done is extremely limited


Sunday, 30 March 2014

Poster Tutorial (P3)

PDF:https://drive.google.com/file/d/0B7Go5XyQzJkuVEJuX3RnZ29sSVU/edit?usp=sharing

Hunter Poster Tutorial


Images needed to create poster:
  • Spartan helmet
  • Sword
  • Fire

Software used:
  • Windows 7
  • Photoshop cs6


Tutorial:


·         Open the program Photoshop cs6
This can be done by searching for “photoshop cs6” in the search bar bar that appears when the windows logo in clicked


·         Create a new canvas of 500 pixels x 500 pixels. 

This can be done by pressing Ctrl+N
Then enter the correct dimensions in the width and height bars.
Then press ok to confirm.


·         Fill black using the paint bucket tool

This can be done by clicking and selecting the paint bucket tool on the left hand side, then left click the canvas, the canvas should then turn black.


·         Import the Spartan helmet image

This is done by going to the file tab located at the top left and then selecting the place button.
Then select the Spartan helmet image.
Make the image a suitable size and place it in the bottom left of the canvas, before pressing the enter button to confirm.


·         Remove the white background
This is done by selecting the magic wand tool located on the left hand side, then using the magic wand tool select the white background of the Spartan helmet, once selected press the Ctrl+DELETE.


·         Adjust the helmet to a suitable position and size

This can be done by using the move tool located at the top of the left side bar and dragging the image to the desired position, the scale of the image can be changed by pressing Ctrl-T.


·         Import and position sword

This can be done by using the same method import method as the Spartan helmet, then use the same method to remove the sword background.
Finally position the image in the correct area of the screen and appropriately transform the image using Ctrl+T.

 
·         Make fire background layer

This can be done by firstly double clicking the layer titled “background” located at the right of the screen and then pressing ok on the window that appears.
Next use the place tool to import the fire image, then drag that layer to the bottom of the list.


·         Merge the Spartan helmet with the black background

This is done by right clicking on the Spartan helmets layer and selecting merge down.


·    Erase the black background so the fire can be seen

This can be done by selecting the layer with the Spartan helmet then use the background eraser tool located on the left side bar
 
     Once selected use the tool around the sword and helmet. The fire image can be moved around to give a better effect.


·         Smudge some of the image to give the impression of the heat and the metal melting

 This can be done by selecting the smudge tool on the left tool bar, the            smudge the sword and helmet and some of the fire.
The finished result: